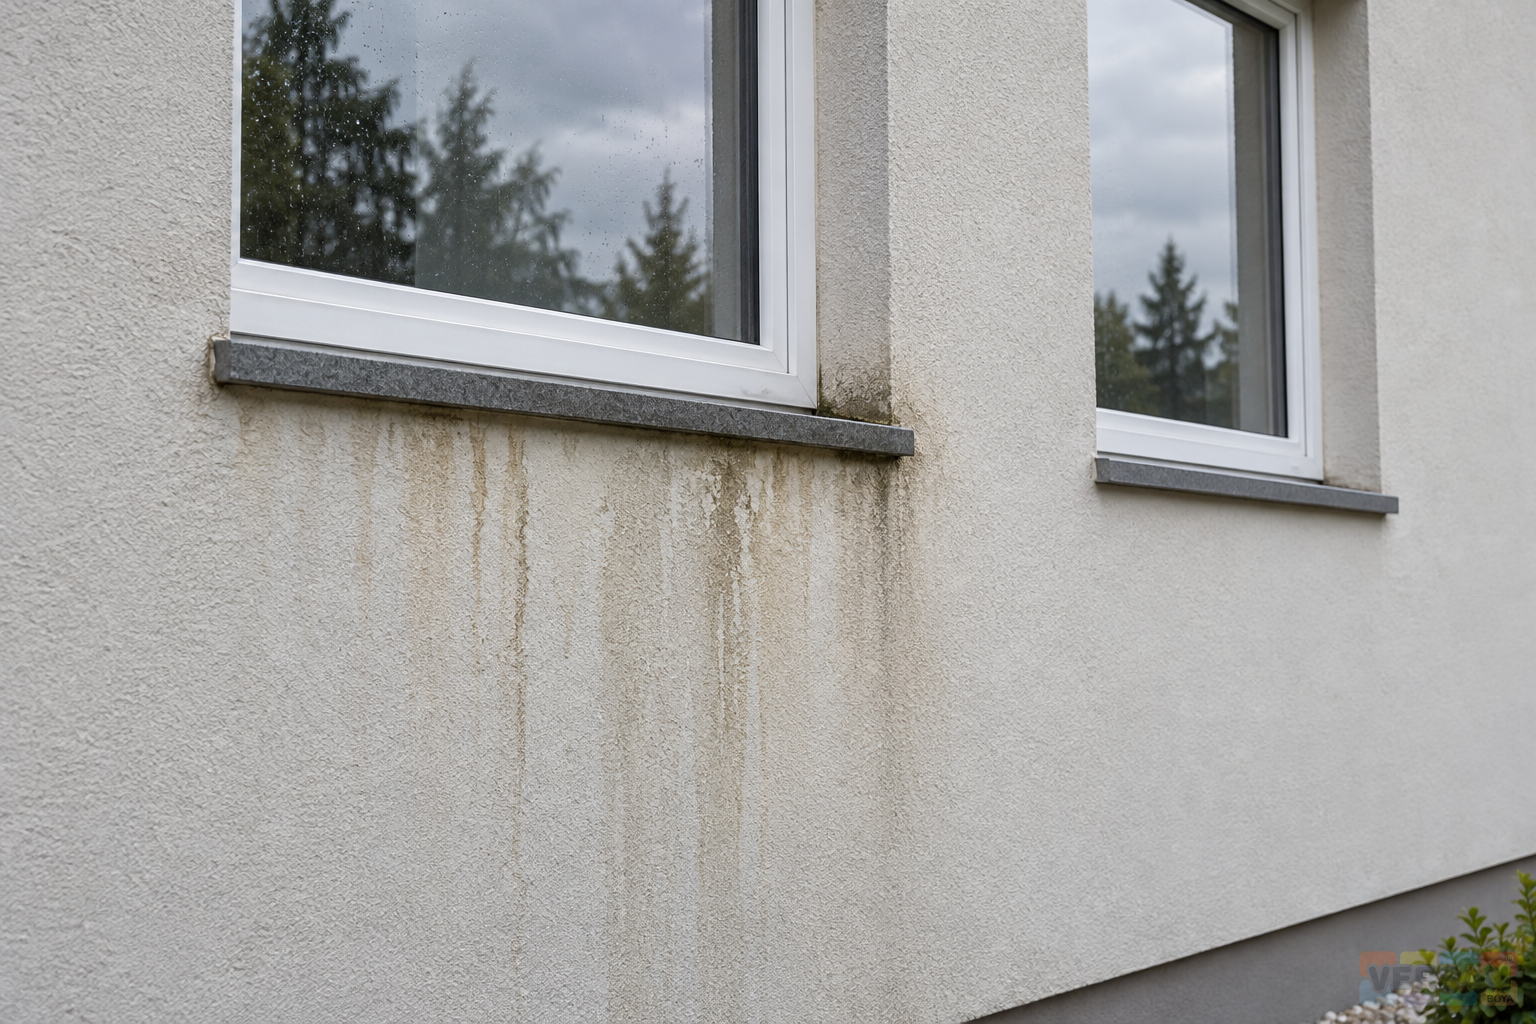
A stain appearing on a newly painted facade after rainfall can quickly be described as a paint failure. That conclusion may be premature. Dirt carried from a sill, soluble material left on the coating surface, moisture moving through masonry and corrosion from an attachment can produce superficially similar trails. A useful response starts by recording where the mark begins and how the coating itself behaves. Cleaning or repainting before those observations are captured can remove evidence that would otherwise help distinguish a surface deposit from an unresolved source of water.
The description silicone-modified exterior paint does not identify the cause of every rain mark or establish that a coating can correct all water-entry defects in a building. This article provides an investigation framework, not a diagnosis from a photograph or a universal cleaning specification. Current product information, existing layers and building details must be considered together. The record examples are editorial planning suggestions rather than reports of a particular customer facade. Their purpose is to organise the sequence from observation to investigation, trial cleaning, repair and the final appearance decision.
1. Capture the initial condition before intervention
Start with an overall elevation view, a photograph showing the apparent origin of the trail and a close view of the surface texture. Identify the window, floor level or elevation so that later observations can be linked to the same location. Record whether the wall is wet or dry at the time of inspection. Temporary wet darkening and a residue remaining after drying are different observations. Note when the rainfall ended, when the coating was applied if that is known, and when the mark was first noticed rather than filling missing dates with an assumption.
Repeated views in comparable lighting are more informative than one isolated image. A change in sun angle can make a gloss difference appear or disappear, while a close-up alone may exaggerate a small local feature. Include an unaffected neighbouring area for context where useful. That does not make the neighbouring patch a controlled laboratory reference; it simply helps describe the visual extent. Agree common location names between the building representative, application contractor and product adviser. Otherwise, comments about several similar windows may be combined accidentally and create a misleading history.
2. Follow the water path upward
The visible stain is not necessarily located at the source of the problem. A trail under a sill may be associated with dirt washed from above or a detail that directs water onto the wall instead of shedding it clear. Consider the relevant sill, gutter, downpipe, parapet and junctions as a connected arrangement. Mark visible runoff paths on a simple elevation sketch. An inaccessible upper detail should remain recorded as uninspected, rather than being described as satisfactory. Necessary access and investigation should be planned by the responsible team before cosmetic treatment begins.
Ask whether the same mark returns below the same connection, whether the area remains dark after surrounding surfaces dry and whether there is a corresponding observation inside the building. These questions help direct an investigation; none independently proves a cause. The published guide to selecting facade systems for moisture, climate and substrate conditions explains why the paint decision should remain connected to the building context. Recoating the lower end of a trail cannot be assumed to correct a source that continues to deliver water from above.
3. Consider surface residue on a recently applied coating
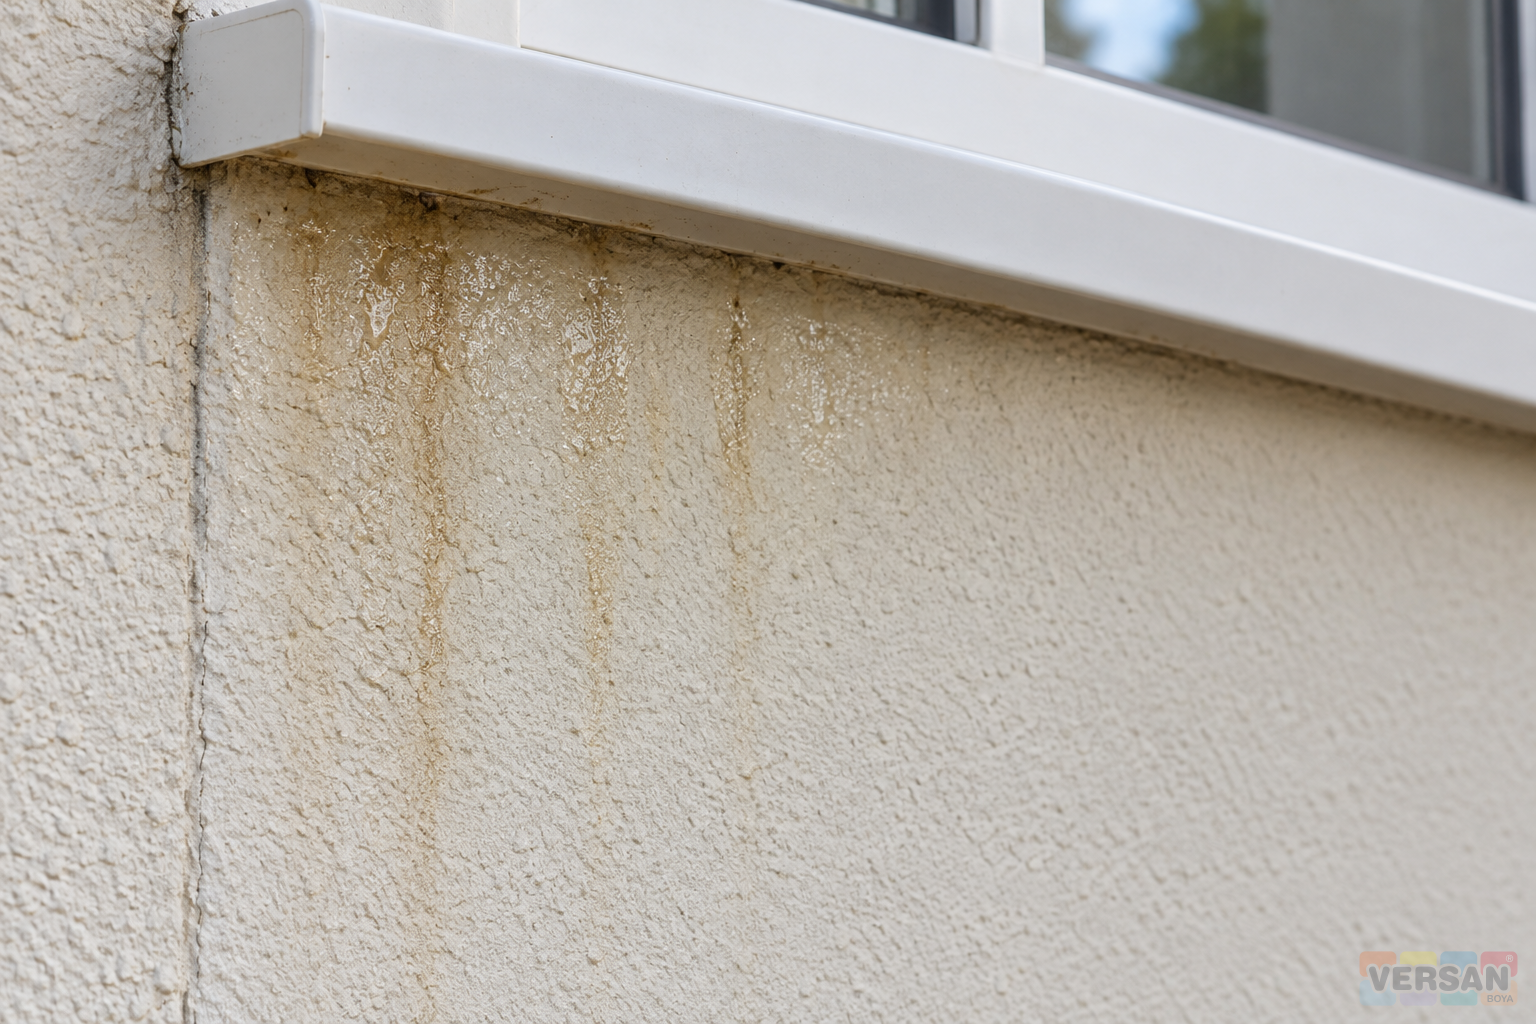
Waterborne coatings can develop concentrated surface deposits under unfavourable drying conditions and early moisture exposure. Manufacturer guidance describes surfactant leaching as a possible explanation for soapy or sticky residues and glossy trails. However, a brown streak alone does not establish that mechanism. The coating type, application history, subsequent weather and character of the deposit must be assessed together. General guidance from another manufacturer is useful background, but it is neither a diagnosis of a particular Nanomix batch nor an instruction to transfer another product's remedial treatment unchanged.
Record coating integrity separately from material sitting on its surface. If the film appears intact but carries a deposit, a controlled cleaning evaluation may be relevant. Blistering, persistent softness or separation between layers presents a different problem and should not be grouped with removable residue. Avoid damaging the film through improvised fingernail tests or aggressive rubbing. Agree an appropriate assessment method with the relevant product and site representatives. Declaring every stain harmless is no more justified than deciding that every stained elevation must be stripped; the extent of intervention should follow evidence.
4. Distinguish salts, dirt and deposits from external sources
A pale crystalline or crust-like deposit on a mineral substrate can be associated with salts carried by moisture. It should not automatically be classified as the same phenomenon as a glossy residue on fresh paint. Recurrent deposits can justify further investigation of moisture movement through the wall. By contrast, dirt collected on a projecting detail may be carried down an otherwise intact coating by runoff. Describe what can actually be observed, such as a white crystalline deposit or a narrow translucent tan trail, before assigning a material or failure category.
For a rust-coloured trail, inspect relevant metal fittings or attachments above the mark. For dark or greenish areas, record shade, repeated wetting and visible contamination without claiming to identify a chemical or biological cause from an image alone. Applying one unverified cleaner to every coloured mark can produce further discolouration. Even when renewal is being considered within the architectural paint range, the source should be investigated first. A new coating may temporarily cover a deposit while leaving the process that generated it completely unchanged.
5. Examine the paint film as well as the stain
Record loose edges, blister boundaries, cracks, chalking or softness as separate findings. Not every area that darkens after rain has suffered permanent colour change; its dry appearance may be different. Equally, a visually continuous topcoat does not prove that every underlying layer is sound. Where necessary, plan representative assessment using methods appropriate to the system and substrate. A brief statement that adhesion is satisfactory provides little help if it does not identify the location, layer and evaluation method. Keep the observation specific enough to support the proposed repair scope.
The article on distinguishing chalking and blistering before facade renewal provides a complementary explanation of film condition. If a deposit can be removed but the coating remains loose, washing alone is not a complete response. Conversely, if the film is suitable and the dry appearance after an approved cleaning trial is acceptable, repainting the whole elevation may not be the immediate first operation. Assess each region in context rather than extrapolating one small sample into a definite treatment quantity for every wall.
6. Plan a small, controlled cleaning trial
Confirm the coating condition and the appropriate maintenance approach before selecting a cleaning process. Identify the trial location, any water or cleaning agent used, the tool and the observation time. Begin with an approach that can provide useful information without unnecessary damage. High pressure, abrasive brushes and strong chemicals are not universally suitable. Do not mix cleaning chemicals or use an arbitrary solvent as a diagnostic shortcut. Protect adjacent glazing, metal, stone, planting and paving, and identify how dirty runoff will be managed. A high-level trial also needs an appropriate access arrangement.
Do not accept a cleaning result only while the wall is wet. Compare the dry appearance with the original record under similar lighting. Has the deposit reduced, has gloss changed, is the cleaning boundary visible and is the film still suitable? Those answers guide the next operation. A successful small trial does not establish that all elevations have the same contamination or drying history. Separate areas may need separate checks. The cleaner's instructions and the coating system's suitability should both be considered before extending the process across a larger surface.
7. Address active water problems before specifying paint
If the investigation points to an overflowing gutter, defective junction or inappropriate drip detail, arrange assessment of that detail as its own repair task. Paint should not be presented as a general substitute for building water management. Identify who will perform the repair and how its result will be checked. Moving runoff onto another part of the facade is not automatically a satisfactory outcome. Access, repair competence and responsibility remain separate from coating supply. The word silicone in a product description does not, by itself, demonstrate a comprehensive waterproofing solution for the building assembly.
Where moisture may be present within several layers, a dry-looking outer surface is not sufficient evidence for immediate recoating. Use an evaluation appropriate to the product and substrate. The name silicone-modified isolating primer does not prove that the material will stop an active leak. A transition primer likewise does not repair the route by which water enters. Such products must be considered within their verified uses. Adding layers before understanding the source can also obscure evidence needed for a later investigation.
8. Select repairs and primers for the actual substrate
After unsuitable or loose material has been dealt with, reassess the remaining substrate. A local repair should form an appropriate transition to surrounding sound material rather than leaving a pronounced island. Exterior filler can be considered for suitable local surface correction, but it does not automatically resolve moving cracks or active moisture. Match the repair depth, substrate and exposure to current product requirements. Different texture or absorbency in the repaired area can affect the finish. Completion of the repair operation and readiness for the coating operation are therefore separate milestones.
Consider silicone-modified exterior primer with the prepared substrate and the chosen topcoat. Exposed-concrete primer addresses a different substrate evaluation and should not become the default simply because a facade requires preparation. Explain what condition the selected material is intended to address. The earlier guide to assessing absorbency before silicone-modified facade paint is particularly relevant where repair patches and existing paint share the same elevation. Product selection should follow those differences rather than hide them.
9. Consider appearance and system compatibility together
If repainting is necessary, a small isolated patch over the stain may not provide the desired appearance. Ageing, application texture and light direction can make the repair boundary visible. Plan the treatment extent with natural architectural breaks where appropriate, and discuss acceptable colour and texture through a trial. Silicone-modified matt facade paint and textured silicone-modified exterior paint are separate finish options. Their application requirements should not be exchanged on the assumption that similar names make them identical materials.
Acrylic matt exterior paint is also a comparison option only after considering the substrate, existing layers and intended use. A visible stain alone does not establish a need to change resin family. If a different system is proposed, confirm compatibility and preparation again. Do not create an improvised formulation by mixing products or brands. Extending the work before the trial has established preparation, colour and texture can turn a local appearance problem into a much larger inconsistency, even where the original deposit has been removed.
10. Protect the early application weather window
Dry conditions at the instant of painting do not demonstrate that the new film will avoid rain or dew during its subsequent development. Connect current product requirements with local observations and the planned sequence. Air and surface temperatures can differ, and a shaded part of an elevation can behave differently from a sunlit section. Work started late in the day should be assessed in that context. Forecasts support planning but do not replace site observations. Do not start simply to fill a diary slot if the cleaned substrate or preceding layer has not been accepted as ready.
Confirm dilution, recoating and early moisture-exposure requirements from current information for the delivered product. Historical catalogue conditions should not be transferred unchanged to the facade being inspected. If work stops, record the stopping boundary and the remaining area so that the next team understands which portion was completed when. Keep batch identity and application method traceable where continuity is required. These records can help explain the starting conditions if a new mark appears later; they do not independently prove a cause or assign responsibility for every subsequent appearance change.
11. Close the response through a further observation
Agree how the treated locations will be followed after cleaning or repair. Retain photographs, the operation performed and the inspection date in one file. The follow-up point should suit the treatment and relevant conditions rather than rely on one universal number of days. Where appropriate, the same runoff point can be observed again after a later natural rainfall. A returning mark may show that the source or material behaviour is not yet fully explained. Preserve the previous observation and add the new finding instead of rewriting the history to make the first intervention appear conclusive.
In a hypothetical facade investigation, a fine deposit beneath one sill might disappear after controlled cleaning while a darker patch at another junction remains. Those locations should not be closed under one general “cleaned” entry. The first needs its dry appearance recorded, while the second may retain an open water-entry investigation. Building operators benefit from knowing which item remains under review. Restoring a uniform colour across the elevation does not establish that every technical issue has been resolved. A follow-up file keeps the appearance outcome distinct from the explanation of its cause.
12. Compare areas under comparable conditions
Choose comparison locations with more than stain intensity in mind. A permanently shaded soffit and a sunny broad wall have different wetting and drying histories. A sill above one area and uninterrupted render above another also change the runoff context. Record orientation, upper details, texture and the current surface state for each location. An untreated area beside a cleaning trial may provide useful visual context, but a process that redistributes deposits can affect that comparison too. Define the trial boundaries, working sequence and protection before beginning rather than interpreting an accidental cleaning edge as controlled evidence.
Assess the dry result from a normal viewing position as well as at close range. A wider view can reveal a tone or gloss difference across the elevation, while close inspection may identify cleaning damage or a loose edge that is not visible from below. Neither observation replaces the other. If the photograph looks improved but the film has not been accepted, keep the item open. Record the successful result, remaining uncertainty and proposed next step in separate statements so that a maintenance team does not mistake an appearance improvement for a complete technical approval.
13. Prepare a decision file for the technical discussion
Provide the product identity, known application date, elevation orientation, existing layers, general and close photographs, weather history and any cleaning-trial result. Describe an uncertain deposit as an observation rather than declaring it a paint defect at the beginning of the enquiry. Include batch information and application records where available. If different people provide conflicting product names or dates, separate confirmed information from information still awaiting verification. A clear file helps the product adviser identify the missing facts without forcing everyone to reconstruct the investigation from disconnected messages.
The decision file should also make the order of operations visible: initial condition, source investigation, trial, any necessary repair and final appearance review. Following that order does not mean prescribing the same treatment everywhere. One area may need cleaning, another a water-detail repair, and another a coating renewal. Professional response depends on addressing the appropriate issue at the appropriate stage. The final coating decision rests on a prepared substrate and verified current information. A photograph, a product name or the colour observed on the first day cannot substitute for that combined assessment.
- Nanomix exterior catalogue archive, page 8: historical product families and preparation framework; not a current technical data sheet.
- Dulux: surfactant leaching: general background on surface deposits in waterborne coatings, not a Nanomix diagnosis or transferred remedial specification.
- Dulux: efflorescence and mottling: general differentiation of moisture-associated salt deposits on masonry.